The Wave Scanner gadget gives you the power to search for your favorite Elliott Wave trade setups across an entire list of market symbols with a single click. It’s the fastest way to draw your attention to your most preferred potential trading opportunities.
Never miss another great wave setup!

You decide which wave setups, markets, and timeframe you’re interested in. Then with one click, the scanner will search for those setups and display the ones that match your criteria. You can also choose from a collection of powerful filters to display only the setups that best meet your trading objectives.
Feature highlights
Your favorite trade setups – Automatically scan wave setups that you choose
Watchlist integration – Conveniently select one of your watchlists to scan (or enter market symbols individually)
Next Subwaves integration – All scan setups are complete wave counts that can be inspected in the Next Subwaves gadget
Chart integration – Trade setups can be quickly highlighted on charts with one click
Advanced filters – Customize scan results to only find trade setups that meet your specific criteria
Save and re-use scans – Once you create a scan, it’s saved in your workspace so you can easily re-run it later
NOTE: The Wave Scanner is not a substitute for critical analysis. For best results, you should consider results from the scanner as a starting point for deeper inspection using the many tools that the WaveBasis platform provides for pro-caliber Elliott Wave analysis.
How do I use it?
Select the Wave Scanner gadget from one of the gadget menus, as you would any other gadget. Once the gadget is open in your workspace, you’re ready to create your first scan.
TIP: Make sure you read this comprehensive guide to getting the best results with the Wave Scanner!
Creating a scan
Click the “+” button in the top right corner of the Wave Scanner to open the scan pop-up dialog. The dialog includes several tabs to allow you to select markets to scan, as well as to precisely define the types of trade setups you would like to scan for:
General

The General tab allows you to give a name to your scans. If you’re scanning for Futures trades, you might name it “Futures”, or if you want to have some fun, you can name it “back to the futures”. It’s up to you.
You can also add some notes to describe your scan. Notes are just for you and they don’t have an effect on the scan results. It’s an effective way to remind yourself of the intention of a particular scan or write down any useful details.
Setups

The Setups tab is where you can select the Elliott Wave setups that you would like to scan for. You must choose at least one wave setup before you can save your scan.
Symbols

Here you can select the symbols you’ll be scanning. You can add any symbol that is included in your subscription plan.
- Enter symbols to scan by typing them one at a time into the Selected symbols area, or…
- Choose one of your watchlists from the dropdown menu to add some or all of the watchlist’s symbols to your scan
- When a watchlist is displayed, simply click on a symbol to add that symbol to the scan
- Click a symbol in the Selected symbols list to remove it from the scan
NOTE: To add a symbol from a specific exchange, follow this format: “Exchange:symbol”, for example “NASDAQ:AAPL”.
Timeframe

The Timeframe tab lets you choose which timeframe and time range that you would like to scan. This is where the scalpers get separated from the swing traders.
You define the time-related aspects of your scan using the following parameters:
Bar width and Bar resolution
These parameters work together to define the size of each price bar in your scan, for example “1 Hour” or “30 Minute”.
Time range and Time interval
These parameters work together to define the amount of past price history to be included in your scan, for example the “Last 90 Days” or the “Last 2 Weeks”.
A simple way to think about this is:
Bar width + Bar resolution over Time range + Time interval
For example, 4 + hour bars over the last 60 + days
NOTE: If you already have a specific start date in mind, you can select it using the Start date field, and your start date will override the Bar- and Time-related settings described above.
Filters

Refine your scan by filtering for specific criteria (Only available with the Trader and up plans).
Here’s the fun part. In the Filters tab, you’ll be able to fine tune the scanner to search for your ideal trade setups. You’ll have the following options:
Minimum rating
Use this to ensure that scan results will only be displayed if they have a rating equal to or above your selected minimum rating. The scanner uses the same rating scale that is included in the Next Subwaves gadget.
Minimum projected gain
Use this to set the minimum percentage change in price you’re looking for. You can set this from as low as 1% to as high as 30%, depending on your trading objectives and the symbols you are scanning.
Wave status
This is an indication of your preference with regard to whether the market has already moved far enough in the direction of the next wave to consider the setup confirmed. Remember that the more confirmed a wave is, the lower the reward/risk ratio will be. Strike a balance between the Wave Status and Minimum rating parameters. Learn more about wave status in the Next Subwaves gadget section.
Target status
This is an indication of your preference for how close the market is to the minimum target price for the wave(s) you are scanning for. As above, you should aim to find a reasonable and realistic balance between Target status and Minimum rating.
Count bias
Some traders prefer to stick to impulsive moves, while others feel comfortable trading corrections. The Count Bias parameter will give you the ability to choose which you prefer. If you would like to scan for both impulsive and corrective patterns, make sure you select “Neutral” as your count bias.
Show buy setups
If you want the scan results to include buy setups, make sure that this parameter is enabled.
Show sell setups
If you want the scan results to include sell setups, make sure that this parameter is enabled.
Short term setups only
When enabled, the scanner will only display setups that are at lower degrees of any wave counts that are found during a scan. What is considered lower degree will be dependent on your Timeframe settings.
Include alternate counts
By default, only the highest ranked wave count is scanned for matching setups. When “Include alternate counts” is enabled, scan results will also include matching setups in any of the 4 highest-ranked wave counts.
Exclude diagonals
If you’d like the scanner to ignore patterns that contain diagonals, make sure this feature is enabled. This is useful for refining a scan to indicate your preference for Elliott Wave standard impulse patterns.
Interacting with scans in the scan list
Once you’ve created and saved a scan, it will appear in the list of scans displayed in the main gadget window. The list displays the name of the scan along with its status and the last time it was run.
You can sort the list by Name, Status, or Last Run by clicking the corresponding header in the table.
Hovering your mouse cursor over a scan in the list will display a toolbar containing familiar tools as shown below:

Running a scan
- Click the Run button on the toolbar as shown above to start a scan.
- While the scan is running, its status will display as “Scanning…“.
- When the scan is complete, its status will display as “Ready“.
- Click a scan’s name in the list to open the results area under the scan.
- While the scan is running, results will be displayed in the results area under the scan as trade setups are found. You can review and interact with a scan’s results while the scan is still running.
NOTE: While a scan is running, the Run button turns into a Cancel button, so that you can cancel a running scan before it completes.
Viewing scan results
Click the name of a scan (or the arrow next to the name) to display the results area. Each scan result in the list highlights a potential trade setup as defined by the options you have selected for the scan.
Clicking a result will display the trade setup on the current chart, along with the complete wave count that the setup was found in. The corresponding target area for the setup is also highlighted (this requires that you have the Support/Resistance Smart tool enabled).
This allows you to quickly assess the potential setup in the proper context right on the chart. The wave count displayed on the chart is just like any other wave count in your workspace. This means you can interact with it using all of the platform tools that you’re used to.

NOTE: you can easily sort the results of each scan by clicking titles of each column in the scanner results, as demonstrated below:
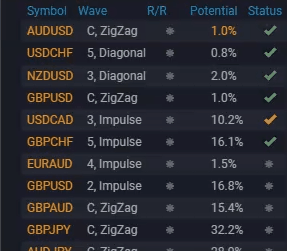
If you’ve used the Next Subwaves gadget, the columns in the scan results list will be familiar:
Symbol – The market symbol the setup applies to
Wave – The wave and pattern name for setup
R/R – This is the ranking for the expected profit potential (Reward/Risk) suggested by a particular wave setup. It will show a number of colored stars from zero to a maximum of 3
Potential – The profit potential of the setup in percentage terms from the current market price to the projected target
Status – This is an indication of whether the market has already moved far enough in the direction of the next wave to consider the setup confirmed. An orange checkmark means the setup is close to being confirmed, while a green checkmark indicates that the setup has been confirmed. A red circle with a line through it indicates that the wave projection is invalid, which usually means that the count should be recalculated to include the most recent market activity.
NOTE: R/R is only included with the Trader and up plans. Lower plan levels indicate whether the setup is a long or short trade.
Running simultaneous scans
Trader and up plans allow multiple scans to be run at the same time for those who are in a hurry!
Important Note
Scan results are not currently saved between WaveBasis sessions. So, if you would like to track or further analyze particular individual scan results, we recommend that you open them in your workspace and/or save them to your chart manager before reloading, closing, or logging out of WaveBasis.