UPDATED: July 23, 2024
Scan for trade setups with confidence
If you’re like most traders, you want to be able to click a button and have the perfect trading opportunities available to you, ready for the taking. The Wave Scanner gadget isn’t a magic bullet, since there is no such thing, but it can quickly guide you toward trades that best fit your specific trading objectives.
The Wave Scanner is not a substitute for proper Elliott Wave analysis. It’s most effective when you know what kind of wave setup you want to trade, but you don’t know which markets might be setting up that way.
This article takes a look at some ways to harness the power of the scanner to find trading opportunities that suit your particular taste.
We’ll cover:
- What is the Wave Scanner gadget?
- Recommended Workflow
- Choosing your Setups
- Timeframe Settings
- Using Advanced Filters
- Combining Setups and Filters effectively
What is the Wave Scanner gadget?

To benefit most from the ideas discussed in this article, you should already have a basic understanding of the features included in the Wave Scanner gadget. This article won’t cover every aspect of all the features of the scanner. We’ll focus on ways to use specific features to help get the best results.
You can learn more about all of the features built in to the Wave Scanner in the Reference Guide.
Recommended Workflow
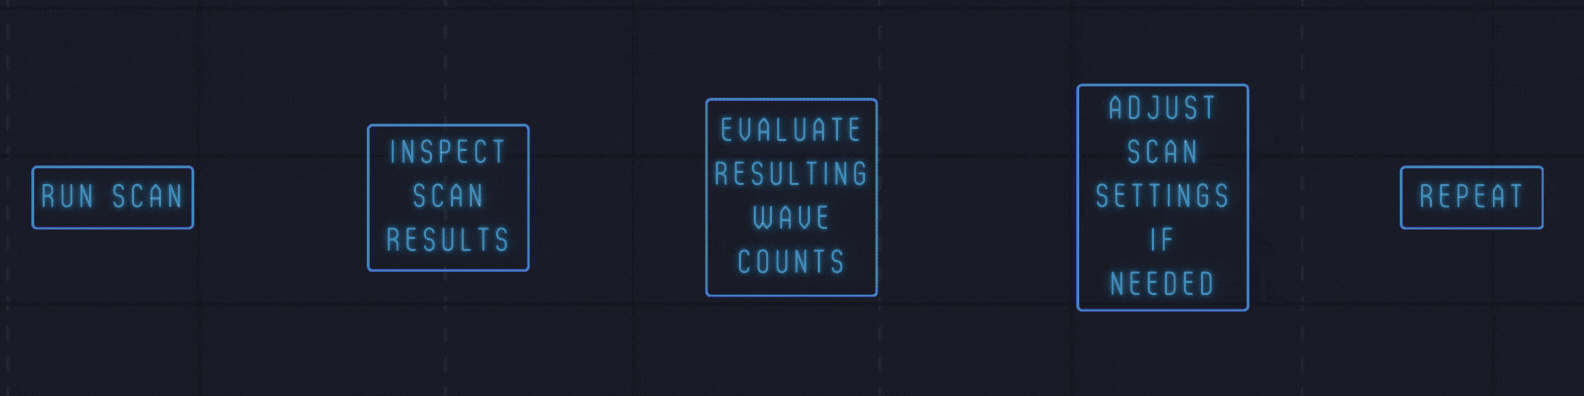
One of the most important things to keep in mind is that the Wave Scanner is not intended to be used as a signal generator.
After you run a scan, you should always closely inspect each wave count result that interests you. Do this before settling on a forecast and/or executing a trade. Scanner wave counts should be critically evaluated in the same way that any other Elliott Wave count would be.
WaveBasis is full of innovative tools which were designed specifically for streamlining the process of evaluating wave counts. In particular, the Smart Tools are extremely effective for quickly assessing the integrity of wave counts.
What should I evaluate?
At a bare minimum, you should ensure that the wave counts included in scan results have a meaningful starting point. This is discussed in more detail later in this article, as well as in a previous article.
Further, keep in mind that a scan that you run today can quite easily produce different results tomorrow. Since most scans use a fixed range of time, a scan will be performed on a different, time-shifted, range of price history from one day to the next. So, you shouldn’t expect to use the scanner to track wave count forecasts over time. This is especially important to keep in mind for scans on smaller timeframes.
The scanner is intended to point you in the direction of potential trade setups, not only to suggest specific trades directly. Be realistic with your expectations, and let the scanner be your guide!
Choosing your Setups
We start our strategic scanning process in the Setups tab. This is where you choose which wave setup(s) you’d like the Wave Scanner to search for.

Be clear about your goals
Wave-3 of a standard Elliott Wave impulse pattern is commonly considered to offer one of the best reward/risk opportunities. So, you might select “Wave 3” to scan for markets that are in a coveted third wave.

Or, you might be more confident trading through market corrections. So, you might choose to scan for markets that are in wave-B or wave-C.
In any case, it’s important that you first decide what you’re trying to achieve with the scanner. Be focused with your goals!
For example, would you prefer to enter a wave-3 trade when wave-3 is already in progress, or would you rather aim to anticipate an upcoming wave-3? Either approach is valid, and the choice will ultimately depend on your trading objectives and personal comfort. For example, scanning for a wave-3 that is already in progress might produce an excellent entry for a longer term trade or investment.
However, we recommend that you consider scanning to anticipate upcoming waves, rather than only scanning for wave setups after they have already started. This is especially important to consider for shorter term trades. In general, this approach can help you better leverage the predictive power inherent in Elliott Wave patterns themselves. It can also dramatically improve the reward to risk profile of your trades.
As they say: “Plan your trade, and trade your plan!”.
Have patience
You might be tempted to use the scanner to search for setups that are happening right now. However, for best results, we recommend that you allow some time to get prepared for your trades. Do this by scanning for the wave that occurs before the wave that you want to trade. This means that you may have to exercise some patience…
To prepare for an upcoming wave-3, simply scan for markets that are in wave-2

This might seem obvious to some of you, but it’s something that hasn’t occurred to many of our traders, and it can be quite powerful. This makes it well worth mentioning.
It might also be obvious that you can use this technique with any of your preferred wave setups. If you want to trade a wave-C, then consider scanning for markets that are in wave-B. If you like to trade wave-5 setups, then scan for wave-4, and so on.
Preparing during wave-2 can give you the best opportunity to “get in early” for wave-3. It will also allow time for the market to test your trade thesis – before you risk any capital. Patience is a learned virtue and valuable asset for experienced Elliott Wave traders. This approach is also discussed in our Let the market come to you video tutorial.
You can combine Filters with your Setup(s) to even further refine your goal. Examples of this are discussed later in this article.
Timeframe Settings
The Timeframe tab is where you choose the chart timeframe that you’d like to scan, along with the amount of past price history you want to include in the scan.

What you choose for timeframe will be dependent on your preferred trading time horizon – how long you want to hold a trade. So, you should first decide how long you would like to hold a trade and choose an appropriate Bar width and Bar resolution.
For example, if you’re looking for longer-term investment opportunities, then a 1 day, 1 week, or 1 month timeframe would generally be most suitable.
If you’re interested in more short-term trades, then an intraday timeframe will generally be more appropriate, such as 15- or 60-minute. Learn more about choosing a wave count timeframe.
However, it’s important to keep in mind that a scan on a higher timeframe might also highlight potential trade opportunities at lower timeframes. This is because scans will always search for wave setups on multiple Elliott Wave degrees which correspond to higher and lower timeframes. Learn more about wave count degrees.
So, we generally recommend starting with a higher timeframe for best results, but feel free to experiment.
How do I choose the right time range?
Setting reasonable timeframe and range parameters is not an exact science. You should use common sense and the basic guidelines below when configuring your scan’s timeframe settings. A scan on daily candles over a range of 5 days obviously wouldn’t make much sense, for example. Similarly, a scan of 60-minute candles over several years also would not be wise or produce good results in a reasonable amount of time.
So, if you want to scan daily candles, several months or years of price history would be a reasonable starting point, and intraday scans should generally not be performed on ranges of more than 1 year.
Basic guidelines for various timeframes
- Monthly candles: Several years
- Weekly candles: More than 1 year
- Daily candles: Several months up to about 4 years
- 60 to 240-minute candles: Less than 1 year
- 30 to 60-minute candles: Less than 4 months
- 15 to 30-minute candles: Less than 6 weeks
- 10 to 15-minute candles: Less than 3 weeks
- 5 to 10-minute candles: less than 10 days
- Under 5-minute candles: less than 5 days
Don’t worry about guessing the perfect combination of timeframe parameters on your first attempt. You can always make adjustments after you’ve run the scan and evaluated the results.
In any case, you should aim to…
Include enough past price history in your scan, so that a significant market turning point is included in the range.
The scan doesn’t have to begin exactly at a significant market turning point, because as long as it’s included in your selected range, the scanner will use Automatic Pivot Detection to identify it.
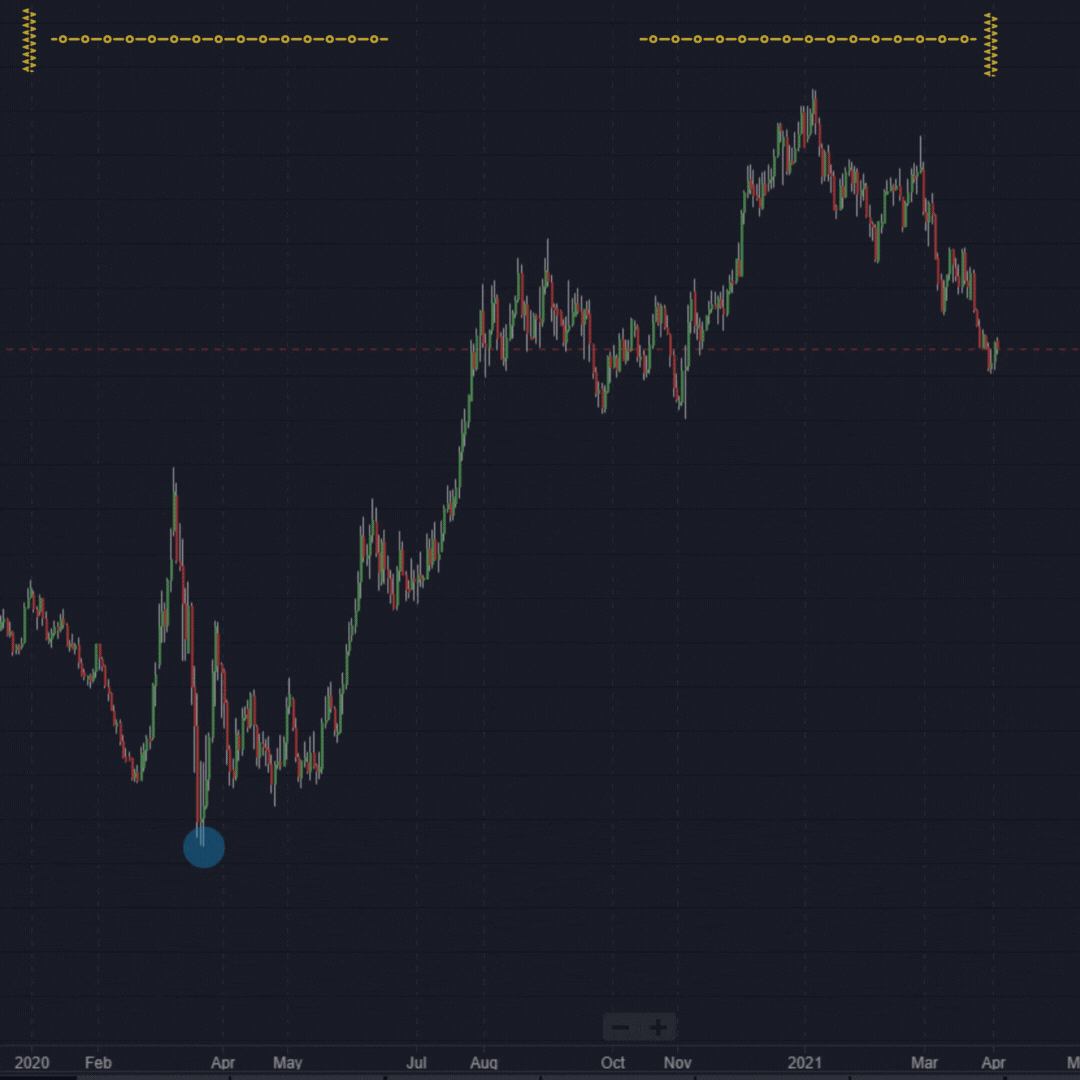
For example, the most recent meaningful turning point on a daily chart of EURUSD occurred in March of 2020, as shown above. So, a time range of 15 months (back from the date of this article) would include that turning point.
What if my scan results don’t include meaningful pivot points?
If your scan results don’t tend to include sensible starting points, then you have two options:
- Adjust the time range settings to encompass more or less time, depending on your findings when inspecting the results, then run your scan again.
For example, if your scan results tend to have starting points that are after a significant market pivot, such as in the middle of a rally, then you might need to select a longer range.
- Adjust the chart so that the starting point is meaningful, then run an automatic wave count. Do this for any scan results that you find particularly compelling. You can enable the Show Autocount Start feature to help you find meaningful market turning points.
If a scan result happens to start near a significant pivot point, running a fresh wave count that starts at the pivot point will very often produce a count that has the same or similar forecast as the scan result. This can help you confirm that the setup(s) indicated by the scan result is based on a valid and reliable wave count.
The critical importance of making sure that your wave counts have meaningful and reliable starting points is discussed in a previous article. We strongly recommend that you read the article. It has helped many of our traders achieve best results with WaveBasis in general, and with the Wave Scanner in particular.
Using Advanced Filters
Filters can be used to further refine your goal, as noted above. This can be useful if you receive too many results to evaluate in a reasonable amount of time. Or, if your results don’t tend to align with your goals, filters can help improve your results overall.
However, when you begin a new scan, you should first run it with the default filter settings, to find out if you even need to configure more specific filters. The filters should be used as a secondary measure, after you have assessed an initial set of results.
The most common reason for not getting scan results, is defining filters that are too strict. So, if your scans are not producing results, try relaxing your filter settings.
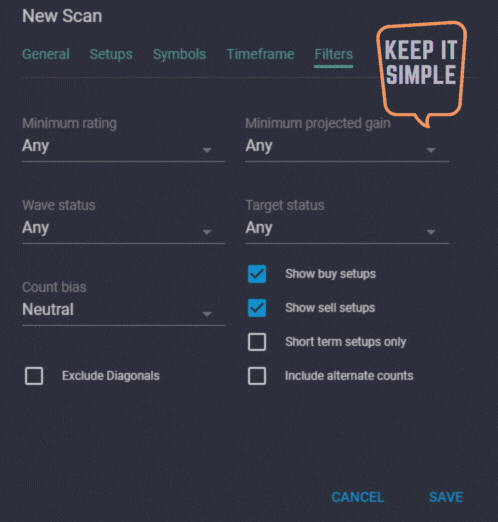
Keep it simple
As the word “filter” implies, filters tend to have the natural effect of reducing the number of results that your scan will produce. So, if you’ve decided that you want to filter your results, you should do so deliberately and sparingly.
An exception to this rule is the “Include alternate counts” filter option. Enabling this option will generally have the effect of increasing the number of results that you receive. It is highly recommended that you experiment with this. Experienced Elliott Wave traders know that alternate wave counts can very often best capture a market’s true wave count context.
Also, keep in mind that you can sort scan results by clicking on the headings of the columns in the table of results, as demonstrated in the scanner documentation. This can help you quickly manually filter the results, so you can focus on the ones that most interest you. So again, you might not need to select any specific filters.
We recommend that you first decide what is most important to you, before going wild with filters. Again, keep your goals in clear focus, and configure only the filters that are in alignment with your highest-priority goals.
Do you only want to trade forex sell setups? Are you looking to trade a potential cryptocurrency breakout? Do you want to find stock market corrections that have almost completed, so that you can prepare for the next impulse wave? We’ll discuss ways to use the filters to address these types of specific goals below.
Be consistent and practical
The second most common reason for not getting scan results, is defining filters that are in conflict with each other. So, if you’re not getting scan results, review your filters to make sure that they are realistic.
You might be tempted to start by using the filters to define the perfect “dream come true” setup. It would be nice if every day presented us with a perfect trade, but the real world is not always so kind.
For example, maybe you like the idea of entering a wave after it has already been confirmed. So, you select “Confirmed” for the Wave status filter. You might also like the idea of only trading setups with a high reward/risk rating (who doesn’t?). So, you would choose “***” (3 stars) for the Minimum rating filter.
This is a problematic combination, because this type of setup naturally happens quite rarely, since the filters are in direct opposition to each other. More specifically, in order for a wave to be considered Confirmed, price has already moved some distance toward the wave target, and away from the start of the wave. We all know that trades entered close to the start of a wave will offer the greatest potential gain, with the lowest expected risk. So, entering a trade later in a wave, after it has already been confirmed, will always have a lower reward/risk ratio than a trade that was entered before the wave is Confirmed.
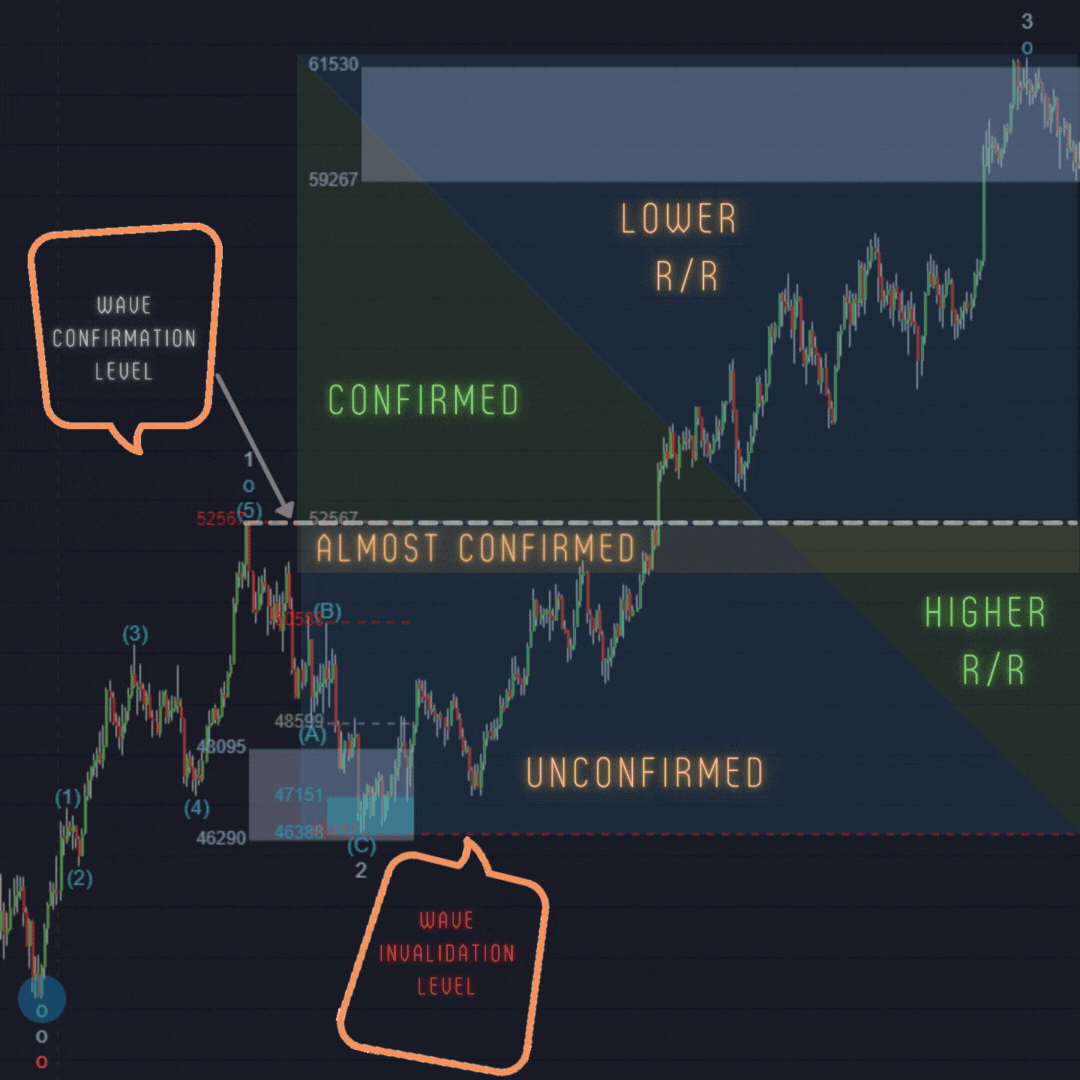
So, scanning for Confirmed waves that additionally have the highest reward/risk rating isn’t consistent or generally practical, as you can see above. Feel free to scan for these types of ideal setups, but don’t be surprised if you often don’t find results.
NOTE: The references to risk in this article assume that you use wave invalidation levels to define risk. If you prefer a different technique for defining and managing risk, feel free to use it and adjust your use of filters accordingly.
Combining Setups and Filters effectively
The Wave Scanner gives you great flexibility to search for exactly the kinds of trades you prefer. Once you’re clear on your goals, you can combine Setups and Filters to define a scan that will help you achieve them. Here are a few examples:
I want to enter a trade near the beginning of a wave-3
Using the example in the Setups section above, you can add a filter to further refine your goals and/or filter out results that you’re not interested in. For example, in addition to selecting wave-2 to anticipate the beginning of wave-3, set a Target status filter of “Almost reached” or “Reached”. This combination can help you anticipate an upcoming wave-3, while also letting you know that wave-2 appears to be coming to an end.
I want to enter when a market is breaking out in a wave-3
Try selecting Wave-3 in the Setups, and “Almost confirmed” in the Wave status filter.
I want to trade (or hedge) a market correction
To anticipate the beginning of a correction, you can scan for Wave-5 Setups with a Target status filter of “Almost reached” or “Reached”.
To enter a correction that is already underway, you can scan for Wave-B Setups with a Target status filter of “Almost reached” or “Reached”.
I’ll trade any bullish impulsive/motive wave that has a high risk/reward rating!
Simply select Wave-1, Wave-3, and Wave-5 in your Setups (if your subscription plan allows), and select “***” (3 stars) for the Minimum rating filter. To scan for buy setups only, make sure “Show buy setups” is selected and “Show sell setups” is not.
Wrapping up
The Wave Scanner gadget might take a little getting used to. So, you should feel free to experiment with various settings and approaches. When used properly, the scanner can help you find some excellent trading opportunities. Remember to evaluate scan results before executing trades, and be clear about what kinds of opportunities you want the scanner to help you find. Be thoughtful when using filters, and experiment with the “Include alternate counts” option, to maximize the number of results.
It’s not push-button magic, but rather a powerful and efficient way to find just the right Elliott Wave setups for your trading style. Whether you trade forex, cryptos, stocks, futures, or other, follow these suggestions along the road to scanner mastery.
Happy scanning!